When managing events, you can use the function to repeat events in a selected time interval automatically. You can set the repetition to different intervals in a single day or multiple days. You can automatically repeat events up to three weeks in advance; the events will be automatically created each day based on your chosen interval. However, automatic repetition is limited to three weeks due to potential changes, which will not be available after sharing in the calendar.
If you need to create an important event more than three weeks in advance, you have to do so manually by going to the given day.
Quick TIP!
You can enable automatic repetition in the reservation template by clicking on the stopwatch icon.

When creating automatic repetition, you must choose the time and day of the event to be repeated and the number of weeks available to sign up in advance. After filling in the necessary information, click the Add button. One event can have multiple repetitions with different days and times. After setting the repetitions, you must click the Save and Apply button to activate the repetition. This will automatically repeat the event on all the dates you have set.
Attention! If you add multiple identical dates on which the event is to be repeated, only one event will be created! You cannot create the same event happening at the same time by using automatic repetitions. Such actions might lead to misunderstandings with clients and we do not recommend doing so even manually. Instead, you might consider using Price Levels.
Quick TIP!
Existing events are not affected by changes or deletions in automatic repetitions. If you need to cancel or delete these events, you must make changes with bulk editing. For more information, go to the article Editing or Cancelling Events.
When using the GYMIFY booking system, you may have noticed that the system differentiates Events and Reservations. The following article describes the differences between the two options and their use. For example, it is more suitable to use Events for unregular or regularly repeated events in your gym (e.g., every Friday and Wednesday). On the other hand, Reservations are more suitable for booking regular intervals over one day.
Go to the main menu and the Booking System section to access Events or Reservations.
If your GYMIFY subscription includes the booking system, but you do not see this option on the main menu, go to the section Administration -> Settings -> Fitness Centre and the General Settings section, where you must enable the management of Events and Reservations.
Quick TIP!

Events are created using predefined templates that you can easily add to your calendar by choosing the template or creating automatic repetition. The calendar ensures that the regularly set events will be accessible in the booking system so clients can sign up in advance. More information about creating events is available in the following articles.
To create a reservation, you must also use a template and add a specific time for clients to register. This system is best suited to book a room, courts, or fitness equipment available for a particular time interval during the day. Admittedly, you could use Events and set automatic repetition for each day and create the same system; however, we do not recommend doing so as this might lead to misunderstandings and complicate the user experience.
The following articles discuss the individual functions of the GYMIFY booking system and focus on how to create and set Events and Reservations.
To simplify the management of Events in the booking system, we recommend you create templates for events (they work similarly to membership templates). You can find this function, with the option to add a new personal trainer or share the booking system, in the right corner of the website.

To create a new template, click the Add Template button, which opens a new window where you need to fill in information about the event. For example, the following information can be added to the event:
We do not recommend using price alternatives for Additional Members. Instead, you should set the maximum number of extra members the clients can sign up with themselves.
Quick TIP!
After creating event templates, they will be accessible in the left part of the calendar.

You can add an event to the calendar by simply dragging the template to the given day, or, if using GYMIFY on small devices, you can click on the given day in the calendar. Then, you can choose an event from the templates or create a one-time event. When creating a new event, the settings are identical to creating templates. However, when you add an event from an existing template, all the information will be already filled in and set.
When creating templates or one-time events, you can add the trainer who will teach the class. In addition, you can add automatic repetitions to make the management of events even simpler. For more information, read the articles Automatic Repetition of Events and Management of Personal Trainers.
To reach the full potential of the GYMIFY system, we recommend using the function of warehouse management, which keeps track of product sales, creates statistics on exports, and can be linked to the cash register or payment gateway. Before using warehouse management and sales records, you must create new items (products and services). When creating services, the text box quantity is ignored. While when creating a new product, the quantity is changed according to the warehousing activity. Go to Main Menu -> Warehousing -> Products to create a new product. It is important to consider which warehousing function you want to use. If you have linked the Dotypos system, which can be used for receipts or electronic sales records, you must first synchronize products in Dotypos before adding new products and services. Additionally, products can be synced afterwards.
When adding a new product, you must fill in the necessary information. This information sets the VAT policy of the fitness centre. To speed up the process, you can use a barcode scanner. However, the scanner must be connected to the device where you can access the GYMIFY system, and it must enable keyboard emulation.
To record products, click on the Identification (Barcode) text box and scan the barcode.

After adding all your products, you can start with the sale. Continue reading if you want to use other functions that GYMIFY Warehouse Management offers, such as restocking products, adding suppliers, or cash management.
You can add suppliers in the section Warehousing ->Suppliers. Then, when restocking, you can add the supplier who delivers the products.
You can restock or dispatch products using goods receipt/issue in the Warehousing -> Account Activity section. If you are restocking products, you must fill in a positive number of new products in the text box. When dispatching products, you must fill in a negative number. Before conducting any account activity, the products must be already created.

When adding products or account activity, you have the option to use quick access by clicking on the Save and Add Another button, which automatically saves the product and opens a new form for another product.
Quick TIP!
The amount of cash on the register automatically changes with product sales using cash payment. You can manually adjust the cash amount on the register by creating a New Register Transaction Activity.

Using this function, you can perform a cash withdrawal from the register or any necessary corrections to the current amount of cash.
All the register and warehousing activities are recorded and processed as chart statistics. In addition, GYMIFY offers you global statistics on sales and client statistics on individual sales and product popularity.
If a mistake has occurred during registration or the card has been lost, you can delete or change the card. The clients must have an identical number within the fitness centre. GYMIFY differentiates between the card number, which is located on the physical card, and the "internal" card number, which is recorded by the barcode scanner.
Printing a card number on the GYMIFY smart cards is not obligatory. However, it can simplify and speed up card identification.

When a mistake has occurred, and the client's card number has been incorrectly recorded, you can edit the card in the client's profile in the section Card Number.

Afterwards, a new dialogue window opens, and you must scan the new smart card number using the tablet. After registering the card, the number is recorded in the system. In the case of the printed card number on the physical card, you must edit/check whether the number is the same as recorded in the system.
If the system has performed a check-in of a different client while you have been adding a new card into the system, you must scan the smart card number again! We recommend deleting the client's card and recording the correct information.
Quick TIP!
If the card has been lost or the client has turned in the card, you can delete it from the client's profile by clicking on Delete Card, and then assign it to a different client. If the original client also deletes their profile on GYMIFY, their card becomes automatically available for a different client.

You can find out whether the client has an assigned card number by going to client records. If the card has been loaded, a green pictogram appears. Green mobile pictogram means that the client is using the GYMIFY mobile app.
Quick TIP!

GYMIFY differentiates between the sale of memberships and other products and services. Membership sales are separated from regular sales due to the specific steps and functions connected to memberships.
The following article assumes that you have already created new products and services that can be sold. If you have not done so yet, read the article Creating New Products and Warehouse Management.
According to your needs, you can set sales, barcode scanning, and printing of receipts in the section Administration -> Settings -> Fitness Centre and the Warehousing section.
Quick TIP!
If you need to perform a quick sale, click the quick sales button (Issue a One-Time Receipt) located in the menu on the left.

Afterwards, a new window opens, offering the most sold items and the option to add new items. Finally, according to your settings, you can close the account with or without automatically printing the receipt after choosing the items.
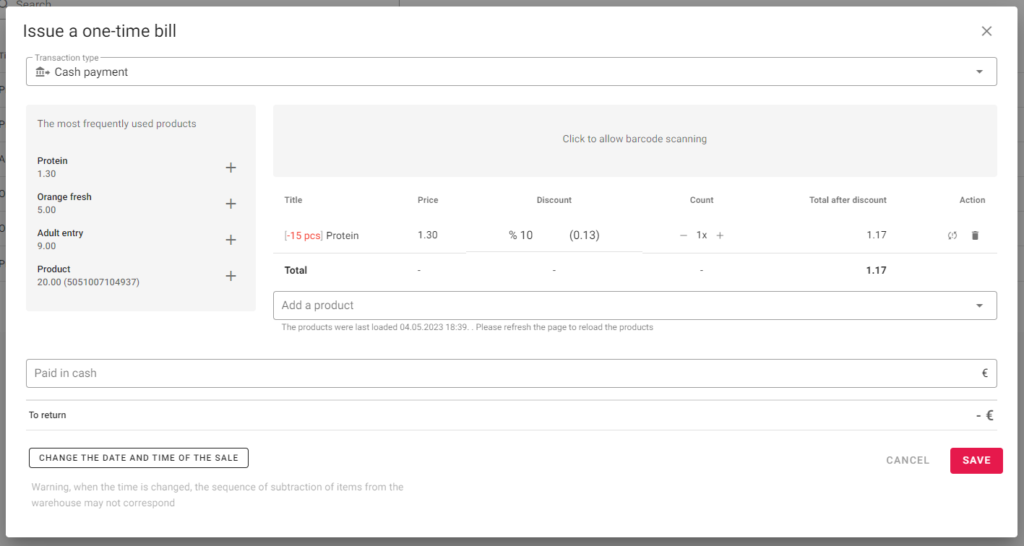
If the system is connected to Dotypos, the receipt is automatically recorded in the electronic record of sales after clicking the Save and Issue a Receipt button. In the instance, your system is not connected to Dotypos, a new window opens offering a preview of the recipt.
Quick TIP!
If you use locker management in GYMIFY, the system automatically opens accounts for registered clients according to their assigned locker numbers. You can also use a similar approach with your unregistered one-time clients.
To do so, you must first allow the function to "Automatically create a receipt after assigning locker" in the section General Settings -> Warehousing.
Afterwards, you can add new items to the account, which stays open until the locker is vacated.

After the locker is vacated, the account closes according to your settings.
Attention! The account is not connected to any registered clients and it can be closed only when the assigned locker is vacated.
Quick TIP!
You can perform sales to registered clients in multiple ways in the system. The options are:
A similar window, such as in anonymous sales, opens when selling. However, the client's name or membership card will be displayed in the upper part of the window.
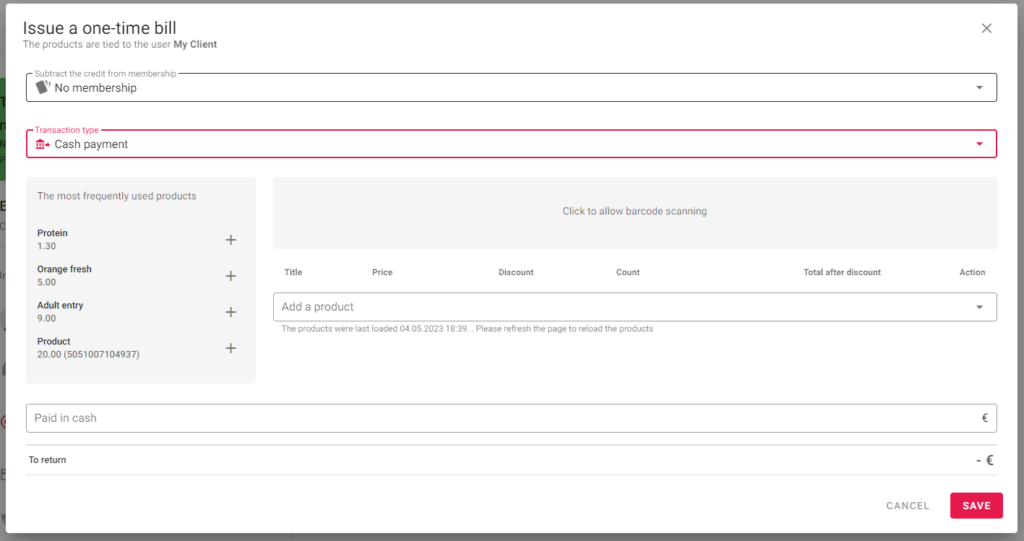
Each time a client checks in, an account automatically opens and closes when the client leaves. So the items will not be 'stuck' in an opened account. To access the opened account, go to the client's profile or click on the client's check-in on the main page.

If you need to open/close an account or edit an existing account, go to the section Open Accounts in the main menu.

You can manually open/close clients' accounts by clicking on Open Accounts. In addition, this section contains information about the accounts opened automatically.
If you are not using the function to sell products using membership cards, then the window shoud be almost identical to anonymous sales. However, we recommend you using this function as it offers sales targeting information, such as client's favourite products.
Quick TIP!
To open quick sales to registered clients, you can click on this icon (see picture below), which is located in client records or the profile of the selected client.

The last option for performing sales is to deduct credit from the client's membership card. To deduct the credit, you must click the Edit Balance button, which you can access by displaying the client's memberships in the client records or the client's profile.

Afterwards, a new window opens; click on the Update by Using Items tab, which opens a window offering the items.
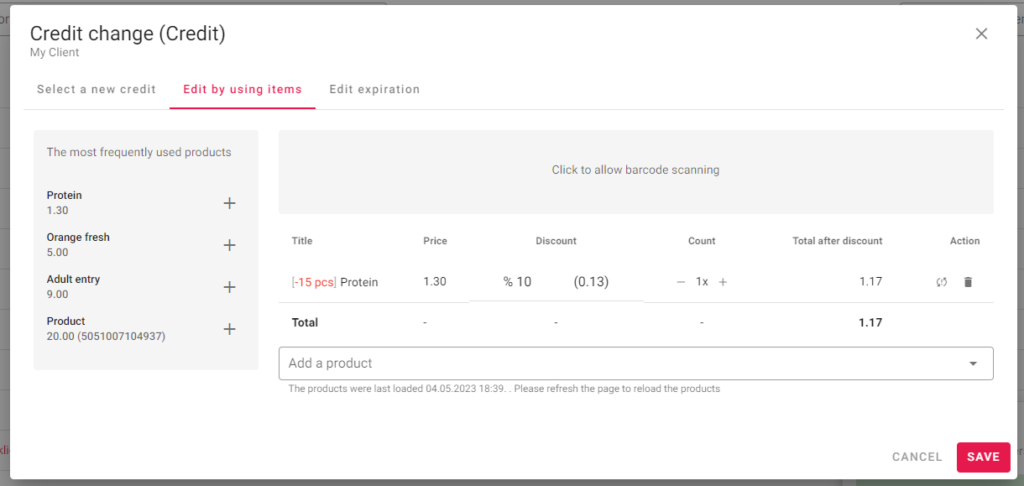
During product sales, other functions are done automatically in the background. For instance, the account balance is automatically recorded in the register when choosing Cash Payment as a payment method. The following article discusses the account balance and cash payments.
After activating your client's membership, you might need to edit it. Some functions, such as creating membership templates or suspending memberships, may be done by your employees. However, you must either allow/disallow this option from your Owner Account. This means that you can control who can make changes in the system.
You can make manual changes to active memberships. This function is useful; for instance, when faulty check-in occurs, the membership is not topped up correctly, multiple check-ins occur, the membership is transferred from a different system, or being edited. You can edit or add new credit to the membership using so-called Safe Editing, which enables changes depending on the type of active membership. In addition, you can also change the expiration date of the membership (e.g., entry memberships).
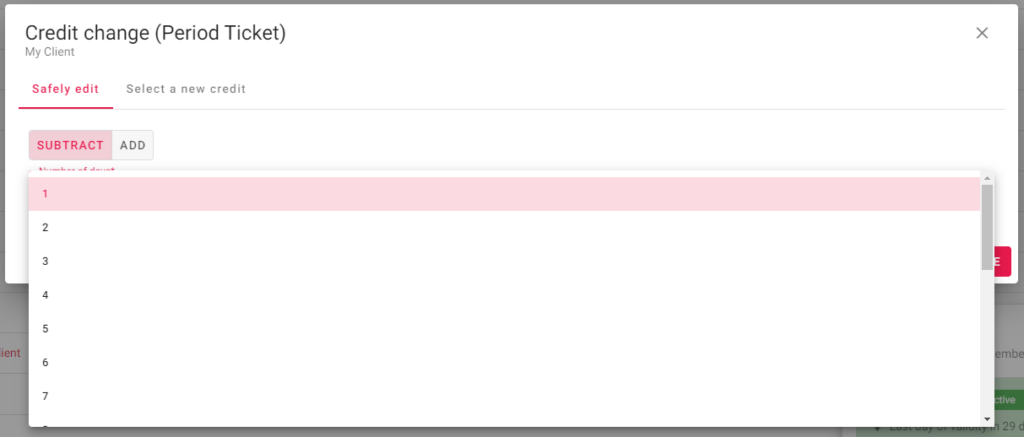
To make the changes, click the Edit Balance button in the detail of the client's membership.

Based on your selected GYMIFY subscription, you can also perform advanced functions with active memberships. For example, using the Pause Membership button, you can pause seasonal memberships, e.g., due to illness. To do this, you must choose a deadline for when the membership will activate again.
If a situation occurs and you need to suspend all the memberships globally, go to the section Administration -> Clients and choose Bulk Suspension of Memberships.
Quick TIP!

When suspending memberships, the deadline of activation marks the last day for when the membership must be reactivated. If the client checks in before the deadline, the membership automatically reactivates!
Quick TIP!
Memberships can be easily transferred between clients. Click on Transfer Membership and choose the new client you want to transfer the membership to.

You can share a membership between multiple people. For instance, to motivate couples to exercise together, you can offer them to share one membership (e.g., couple memberships). First, the membership is registered to the client who paid it. Afterwards, you can share it with other clients using the Share Membership button. The clients then can use it, for instance, to create reservations in the GYMIFY booking system.
To cancel sharing of membership, you can either delete the main membership or just delete the membership in the client's profile with whom it is shared.
Quick TIP!
Membership templates serve to simplify and organise membership administration. Therefore, creating new membership templates you want to sell should be among the first steps when setting up the GYMIFY system. You should do so right after completing the General Settings of the Fitness Centre and, if possible, before registering the first client.
The GYMIFY system distinguishes three types of memberships:
The templates are based on one of the three types and can be used for specific functions. Clients can have either only one membership or multiple memberships, depending on the selected services. For instance, the client can have a Monthly membership for the fitness centre and a 10-entry membership for the sauna.
To create a new membership template, go to the menu on the left side and choose the section Administration -> Memberships. Next, click the Add a Membership Template button, which allows you to create new templates. It contains only three simple steps, and it is easy to navigate.
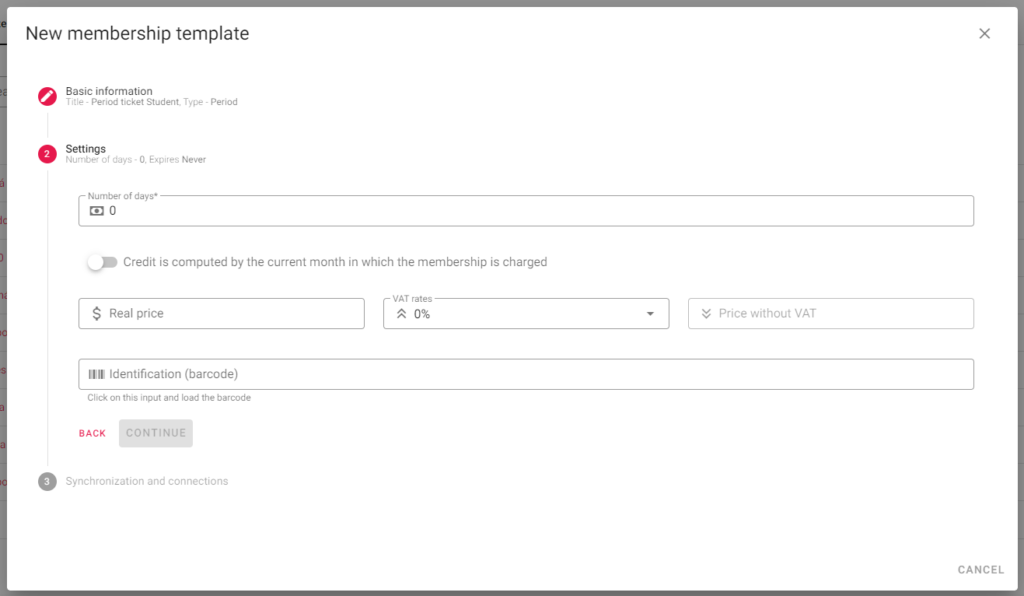
We recomment you to always entre the Real price of the membership, even if you do not use the warehouse management function or statistics. In the case you decide to upgrade your subscription later, the information will be useful for creating statistics on sales of memberships.
Quick TIP!
Finally, the template allows you to link the membership with a locker, meaning that a locker will be automatically assigned when the client checks in.
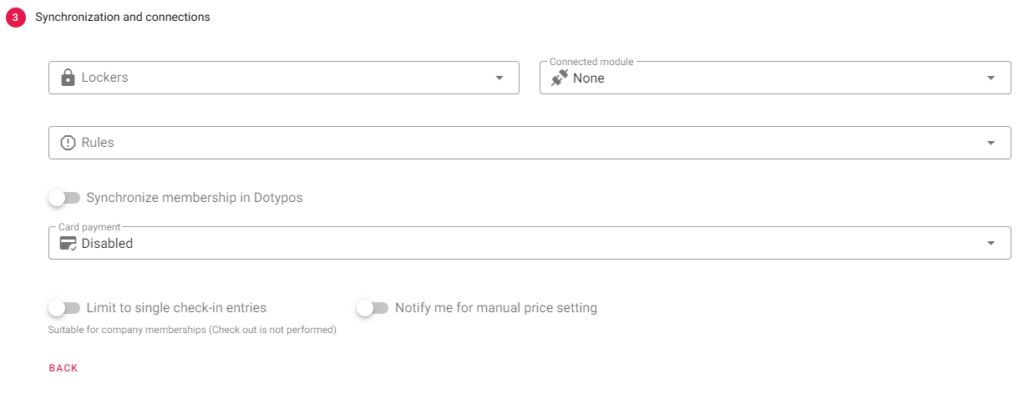
When creating a company membership, click on Limit to Single Check-ins to allow multiple check-ins. This step cancels out the double check-ins when arriving and leaving the gym.
Quick TIP!
After creating the templates, you can start charging them to your clients. For further changes, you can easily edit the existing templates. This action will not affect the already active memberships.
Membership rules are a valuable extension to the types of memberships. They can vastly improve your fitness centre. For instance, they can help you to avoid overcrowded or empty gyms. Using membership rules, you can change prices according to the following:
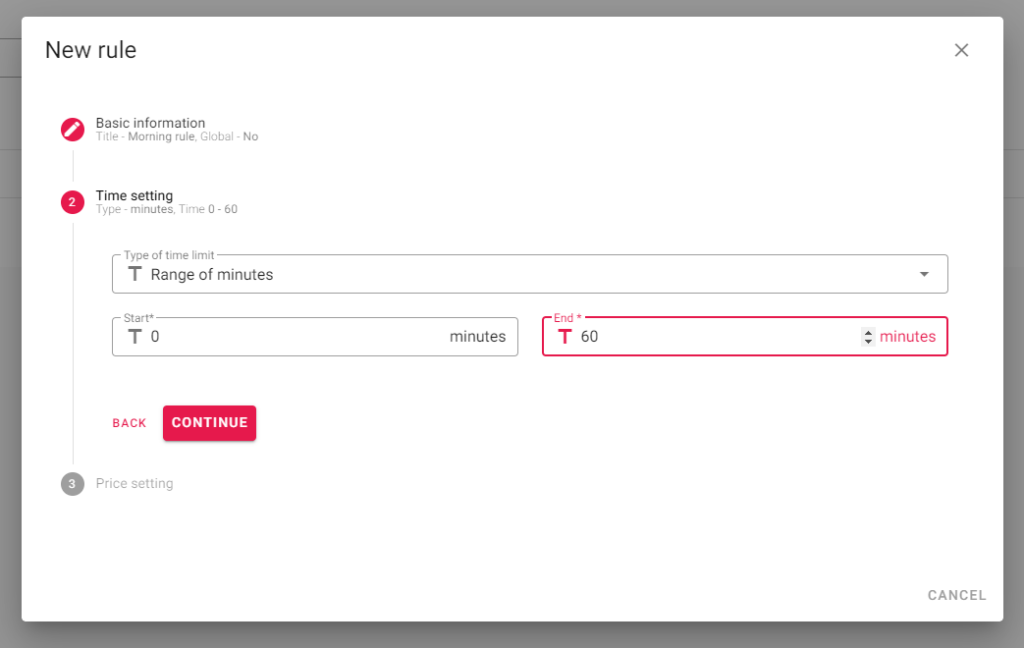
When creating the rule, you can activate it for all the selected membership templates or add the rule to individual templates. Afterwards, you can change or set a completely new entrance fee. The rules activate automatically in the selected period.
We recommend testing the rules on individual clients or in the trial version. Should you have any questions, write to GYMIFY support.
Quick TIP!
After registering a new or existing client, the first step is adding the selected membership. You can select and charge the membership right when registering the client.

You can choose a given day when the membership activates by clicking on the calendar icon.
Quick TIP!
You can add a new membership to registered clients in the client records by searching for the selected client (menu on the left side -> Administration -> Clients). The membership can be added in the client records overview or the client's profile.

After clicking on the Add a Membership button, a new window opens, and you can choose to either upload the membership using a template or create a new membership. Uploading your own memberships can be limited only to the manager account, as described in the Employees and Accounts article.

When adding a new membership, you can select a discount according to the chosen service or choose an automatic issue of a receipt. You can also add an empty membership, which the client can buy and activate in their GYMIFY profile. When adding your own membership, you can set and activate specific parameters which are not commonly used (e.g., weekly memberships).
If you are using an identical template, you can top up the membership in advance. The remaining credit is not altered (e.g., when the client still has 5 days remaining and you add a new 30-day membership, the balance will be 35 days). ATTENTION! This does not apply when adding a different template; the remaining credit is overwritten.
Quick TIP!
You can offer one-time or individual discounts based on the selected services. When using the warehouse management and the sales of products and services function, the membership sales are recorded as regular sales of services. When deleting the membership, you can deduct it from sales (by performing a correction).

For more information on creating membership templates and their use, go to the articles Creating New Membership Templates or Suspending/Editing/Transfering Memberships.
The main page automatically displays the essential information and is the most important GYMIFY section for the fitness centre staff's everyday use. The main page is displayed after logging into the system or clicking the Dashboard button on the main menu.

After logging into the system for the first time (i.e., empty fitness centre), the system is ready for the first check-in or locker assignment. Additionally, you can enable check-ins on the main page using GPS location in the GYMIFY mobile app if you have not done so yet.
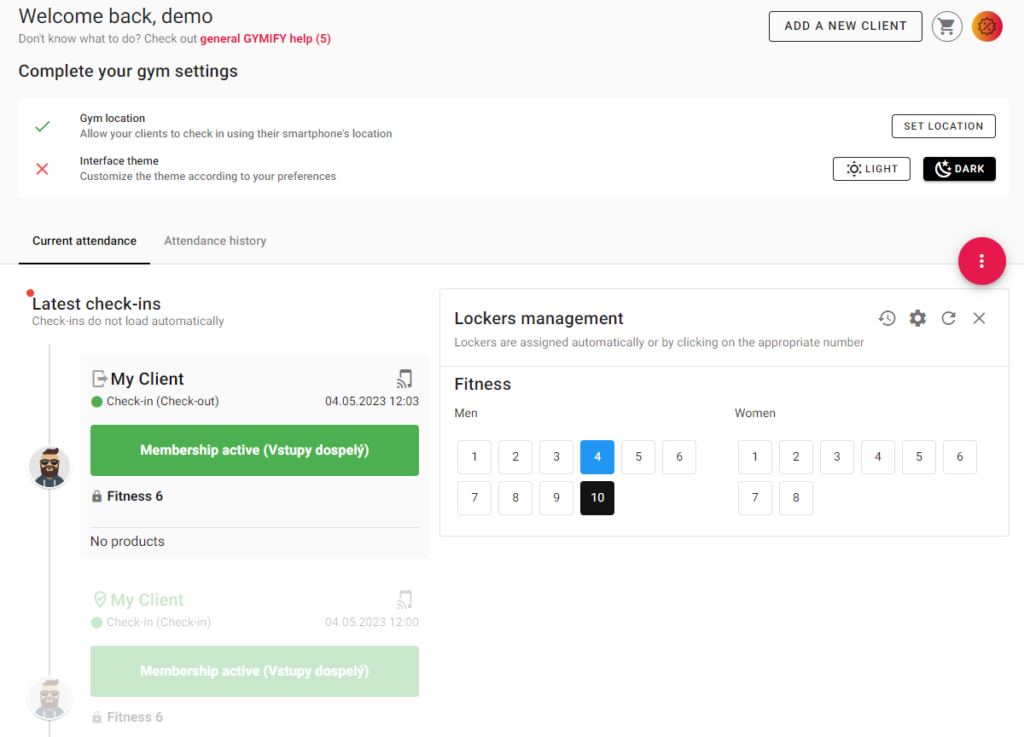
You can display all the check-ins on the given day as a chart in the Attendance History tab.
The green dot placed right over the text Latest Check-ins means that all the different kinds of check-ins are displayed automatically.
Quick TIP!
After the attendance has been recorded, the information about the check-in is immediately displayed. In addition, the timeline highlights information about unsuccessful check-ins or check-in requests. Unsuccessful check-ins may occur, for instance, when the client has multiple memberships, which can be used both for recording attendance or buying products and services. It is necessary to complete the check-in. Otherwise, the client will not be able to register. The picture below displays a successful check-in of a trial client with active membership.

If you use automatic locker assignment, the main page also displays the locker records showing lockers that were either automatically assigned or manually chosen.

The quick access for new client registration is available in the upper right corner. Additionally, you can create new registration using an empty smart card.
Quick TIP!