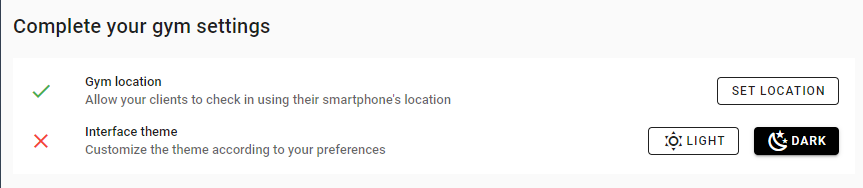
As one of the first steps after logging in, you should fill in the basic settings. This task can be done only from the owner's account and if the fitness centre is empty (i.e., especially the system). This means that the system cannot record any check-ins so as not to interfere with the system's settings, which depend on the settings of client records.
In the settings, you can choose which information is displayed on the main menu, the general settings of client records or advanced settings, such as remote door locks.
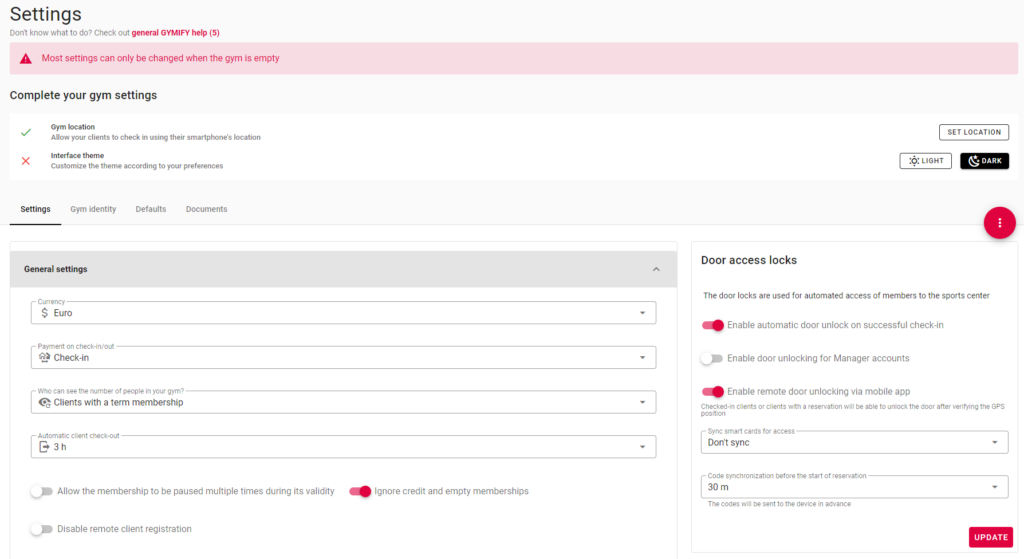
You must set the following information:
All these settings are described right in the GYMIFY system. Before officially launching the system in your fitness centre, we recommend checking whether the current settings are satisfactory. In the case of any problems, they can be easily changed after the closing time when your fitness centre is empty.
Do not postpone setting the basic information, it should be one of the first steps after logging in to your owner's account.
Quick TIP!
After successfully filling in the basic settings, you can fill in your Gym Identity Settings on the main page. Afterwards, your fitness centre is displayed on our main website, gymify.io (or gymify.sk, gymify.cz). You can change the information about your fitness centre in the section Identity.
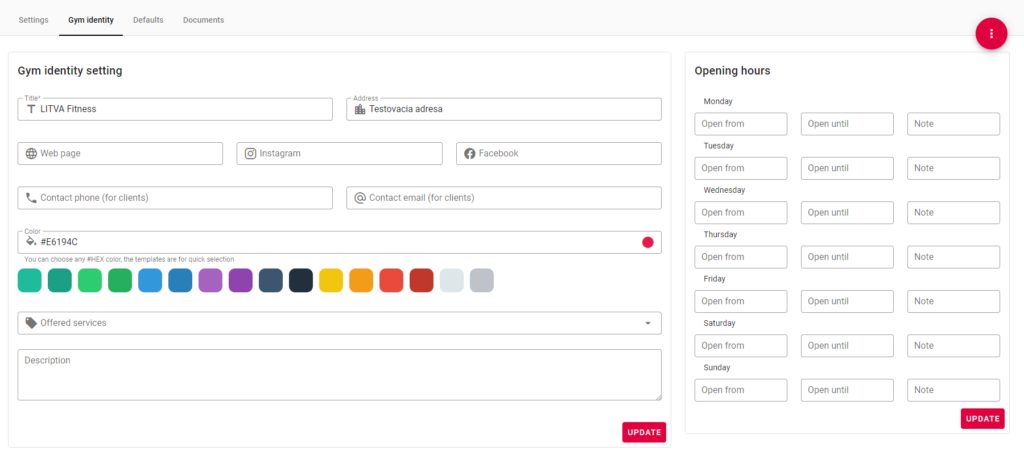
If you fill in all the information, you can achieve higher popularity of your subsite on your GYMIFY website and Google.
You can upload your logo, which is displayed in the GYMIFY Reader App in your tablet, in the bottom part of the Identity section. Additionally, you can edit the colour scheme, which is also displayed in your tablet, to fit your fitness centre.
Quick TIP!
The function of the GYMIFY Reader App is to connect clients to the GYMIFY software. After performing all the steps mentioned in the article Before You Start, you will receive a tablet for smart card scanning in the GYMIFY system.
After receiving the tablet, the GYMIFY Reader App should be installed and prepared for the first login. Additionally, the app should be automatically running after turning on the tablet. If, by any chance, the app is not installed, go to the app Google Play and search for GYMIFY Reader (link to Google Play). After installing the app, use your manager account created in GYMIFY to log in.
Before logining in, check whether you are connected to internet. The tablet must be connected to your local WiFi to communicate with GYMIFY.
Quick TIP!
If the app has already been installed, log in using one of your manager accounts. After logging in, the desktop should be personalised using your colour scheme and logo (if you skipped the general settings, you can find more information on how to set colours and logo in the article General Settings).
When the smart card is tapped on the designated area, the table records the client's attendance (check-in). In addition, clients have multiple ways to record a check-in; for more information, go to the article Clients Identification. Clients can register for GYMIFY after scanning the QR code and clicking the Sign up for GYMIFY! button. Afterwards, they have to fill in the necessary information.
To change the GYMIFY Reader App settings, click on the cog wheel icon in the upper left corner and enter your password.
In the settings, you can change the duration of the check-in notification on the screen.
Quick TIP!
We have encountered a few problems that may happen while running the app. However, there is nothing to worry about, and the solutions are simple and can be dealt with in a matter of minutes.
In the app, clients can upload their profile pictures using the camera button in the upper left corner.
Quick TIP!
The app also lets clients choose their membership if they have multiple active memberships. Additionally, the app can be downloaded to any tablet using the Android system. However, we guarantee full compatibility only with our supplied tablets.
After successfully activating your clients' memberships, they can choose which of the check-in methods suits them best. The check-in methods depend on the fitness centre's preferences.
If you are using or planning to use our smart cards, the clients can check in by tapping the card on the tablet at your fitness centre's reception desk. If you do not have the tablet, it will be delivered before you launch the GYMIFY system at your fitness centre. Additionally, you will receive smart cards with your design.
After tapping the card, the client can see their membership status, exercise time, assigned locker number, or purchased products on the given day.
In addition, clients can select which membership they want to use in the GYMIFY Reader App. However, this option is displayed only if the client has multiple memberships.
For more information, read the article GYMIFY Tablet Reader App.
The GYMIFY clients can use our GYMIFY Mobile App. They can find instructions on installing and using the app on the main page, https://gymify.io/blog/how-to-install-gymify-app and https://gymify.io/blog/gymify-app-as-innovative-plastic-cards-alternative.
In the mobile app, clients have three check-in methods. They can check in using GPS location, scan the QR code on the tablet, or request a check-in, which is then manually approved by the staff. The clients can choose which method suits them best.
To verify the GPS location, you must set the location of your fitness centre. Afterwards, it is compared to the location of the client's mobile device, which must correspond to the fitness centre location at least 90%. You can change the location settings at any time.
You can allow quick client registration or QR code generation for client identification using the mobile app in the GYMIFY Reader settings in the tablet.
Quick TIP!
If the client forgets or loses their card or their mobile battery is drained, you can perform a manual check-in in the client's profile or client records. The manual check-in is the same as tapping the smart card or using the mobile app. Therefore, all the mentioned check-in methods are identical and are automatically displayed on the main page.
Clients always record their arrival; however, it is up to you and your clients if they record their exits. For example, if you check whether the memberships are active at the client's exit, you must also record their exit in the system. Otherwise, the clients can optionally record their exits, which can be useful as it creates statistics about their exercise time and displays them in their profile.
If the exit is not recorded, it is automatically recorded after the chosen period, which you can set in your Fitness Centre Settings.
After completing the registration to GYMIFY, you gain access to your Owner Account. You will receive a welcome email through which you can set a new password and log in to your account for the first time. If you are already launching the system, it automatically displays the contract with the agreed terms and enables online signature. After approving the contract, the owner and the staff can access the system depending on the selected subscription.
After logging in for the first time, you should explore the system and familiarise yourself with its functions. The system cannot provide all the instructions for all the individual functions. First, you should get acquainted with the functions concerning clients, memberships, and the main page, which all automatically offer essential information.
After exploring the system, you should:
After completing the basic settings and client registration, you should familiarise yourself with more complex functions concerning clients, which are described in the article Clients. No matter the selected subscription, all the fitness centres can be promoted and shared on the GYMIFY website, where they can have their subsite, be shown on our map, and share information on the main page with their clients. You can access all the fitness centres using GYMIFY here!
Read the article Navigating the Main Page, for more information on the functions of the main page. When you are using a more advanced subscription, you have to get acquainted with more functions, such as:
After familiarising yourself with the advanced functions, you can connect GYMIFY to third-party services, such as remote door lock access, Dotypos POS system, or Stripe Payment Gateway, which enables online payments to your account.
We recommend you read the information on client and memberships registration. The system provides quick access to help, which displays all the available articles concerning the selected funciton, and you can find this always on the bottom right corner, so you can easily access help should you encounter any problems.
Quick TIP!
GYMIFY and its complimentary services provide fully-fledged software for fitness centres, CrossFit gyms, sports centres and other venues. GYMIFY, with all of its services, includes:
Start using GYMIFY today! Register your fitness centre here. Additionally, before registering, you can familiarise yourself with the types of subscriptions we offer in our Price list for fitness centres and choose the one that suits you best. The more information you provide before registration, the easier and quicker it will be for you to navigate the GYMIFY system.
PS: Some functions can be added/removed from the subscriptions, or alternatively, you can create your own individual subscription. So if you have not found what you are looking for, contact us for our special offers.
Quick TIP!
If our software meets your requirements and you are interested in further cooperation with us, you can contact us. We can provide you with your smart cards printed with your fitness centre design. We can create the designs or provide the necessary information if you prefer your graphic designer. After printing the cards (it takes max. 7 days), we send you the cards and a smart card reader tablet with preinstalled GYMIFY Reader App. Right now, all you have to do to start using GYMIFY is sign the contract. Additionally, GYMIFY supports a wide range of accounts.
GYMIFY provides accounts for:
In addition, you can also manage other fitness centre employees and have all the information about your gym in one system.
If you have any questions, we provide online consultations, which are for free for all potential clients!
Quick TIP!
The existing events can be edited, but these changes cannot affect the client registration settings. Therefore, the system will not allow you to change these parameters when editing. Additionally, if you decide to make changes to existing reservations, you should consider contacting the registered clients and informing them about the changes.
You can contact your clients by email or SMS message in GYMIFY by going to the management icon in the details of the event in the calendar.
Quick TIP!
You can make changes in the calendar using bulk edits. By choosing one or more events in the calendar, you can:
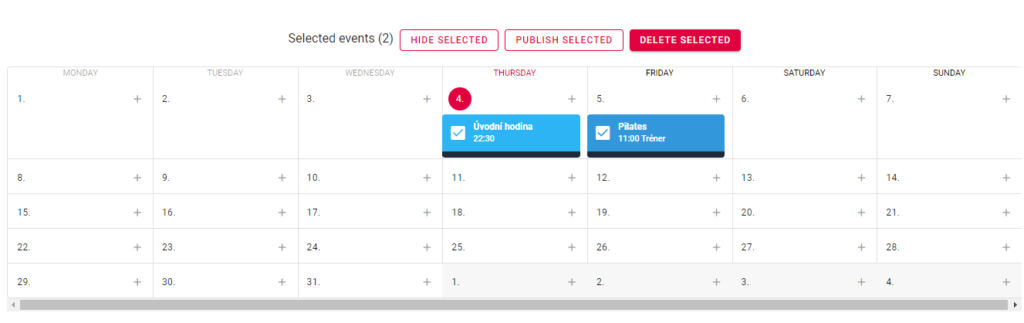
If you want to delete multiple or just one event, the system will not allow you to delete events with registered clients. Such events can only be cancelled; the clients will be alerted to the change and signed out. Afterwards, the event will still be visible as Cancelled in the booking system but will no longer be available for registration. Then, you can delete the event; however, we recommend leaving the cancelled event in the calendar to avoid any misunderstandings with the clients.
You can make changes to reservations in the booking system, whether they are shared or hidden from the clients. However, it is better to hide the event when making any necessary changes and then share it with the clients and open it for registration.
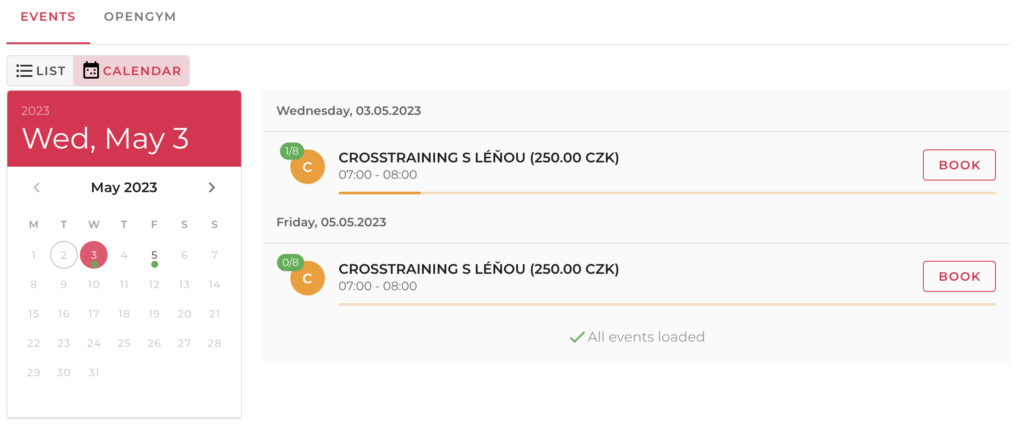
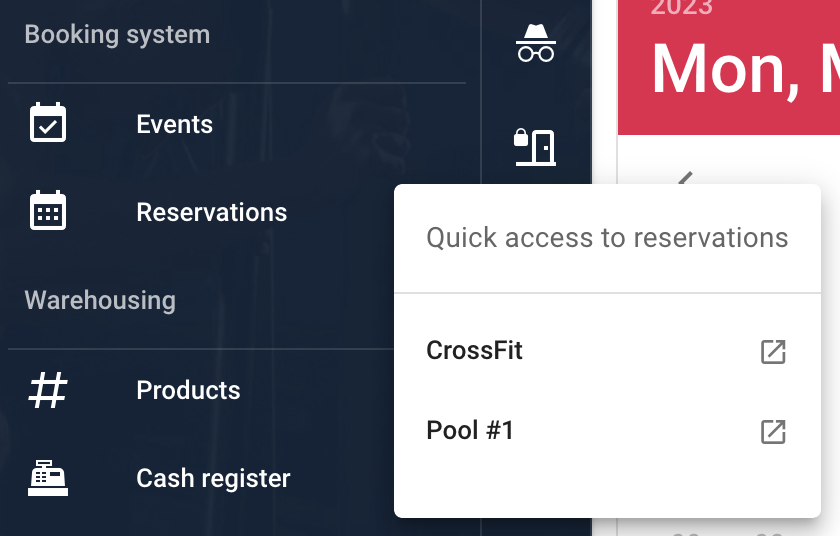
Fitness centres and other businesses using the GYMIFY system have their profile containing information about the fitness centre and the GYMIFY booking system. It is available on gymify.io (or similar websites, gymify.sk, gymify.cz, etc.). The booking system is also available on the GYMIFY mobile app for Android and iOS. Here, the client can access all the events and reservations created by the fitness owner.
To promote the booking system under your brand, you can:
After clicking on the option to share the booking system, follow the instruction in the pop-up window or give access to your programmer or website manager.
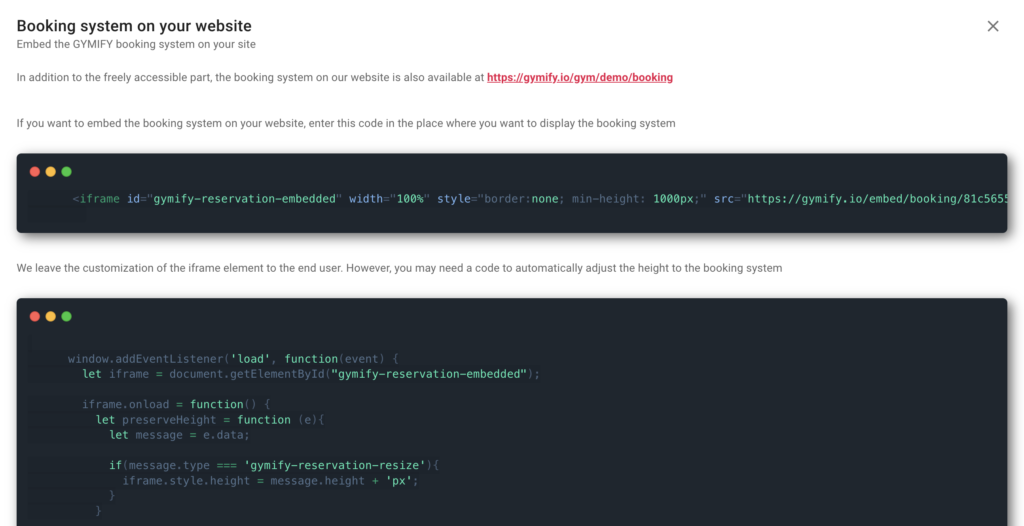
The colour scheme of your shared booking system can be set in the Gym Identity Settings.
To create a reservation, you must first create a reservation template and set the registration time. You can create and set templates in the Reservations section in the right corner of the website.

To set a new template, you must fill in the following information:
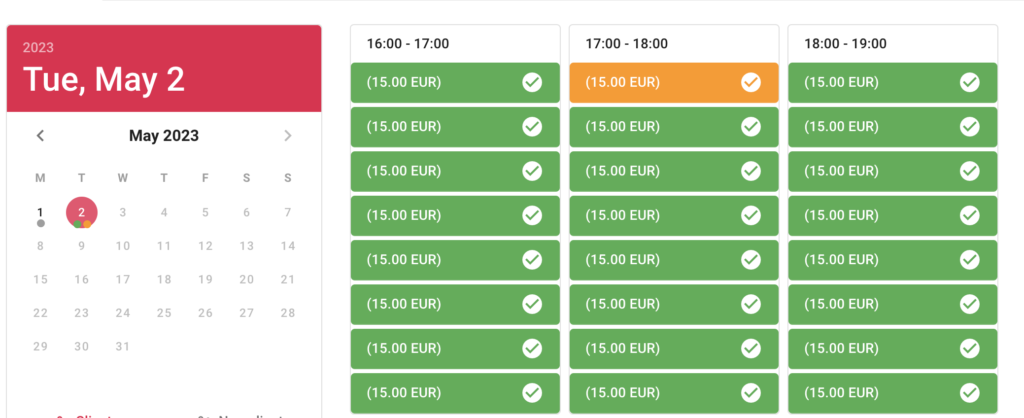
The shortest and longest reservations are set using time intervals. For instance, if you select the time interval to be 60 minutes and the minimum reservation time for 2 intervals, then the reservation period must be at least 120 minutes.
Quick TIP!
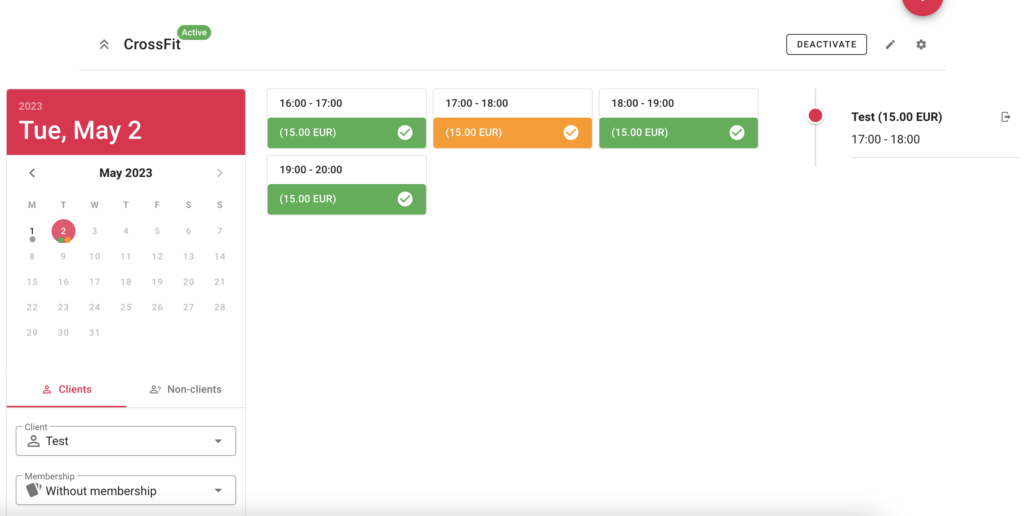
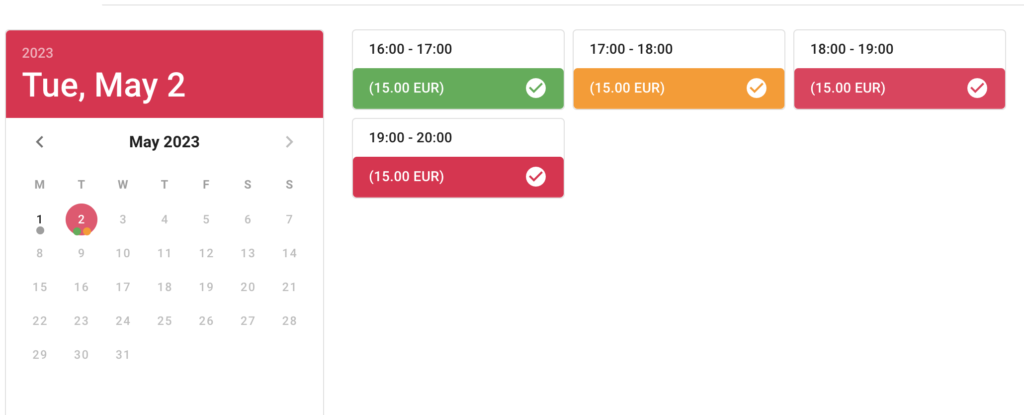
If you enable multiple clients to sign up for one reservation, then you can display a detailed overview of the reservation records by clicking on the double arrow icon right next to the reservation template. After activating Extended View, the individual reservations will be displayed separately according to time intervals and individual reservation spots for which the clients can sign up.
After creating the first reservation template, you can edit, activate, or deactivate the event. This action will either show or hide the event and influence client reservation. For more information on how to change settings of reservation templates, go to the article Setting Reservation Time.

You can edit the reservation templates by going to the specific template. The main menu provides quick access to the created templates.
When choosing a template, you will be redirected to a sign-up timetable. On the right side of the page, you can display the signed-up clients on the given day. The offered reservations also show information about the registered clients. Additionally, you can manually register clients for a specific time.
You can also edit and delete reservations or sign up new clients. In addition, you can add not only registered clients but also new clients who are not registered.
If the client needs to cancel a specific reservation time, you can cancel only the selected time or the whole reservation on the right side of the reservation template. On the other hand, if the client wants to add a reservation time, you have to create a completely new reservation!
Quick TIP!
You can connect the reservation template or events to remote locks. More information is available in the article Door Access Locks. In addition, you can also connect the Stripe payment gateway; for more information, go to the article Connecting Stripe Payment Gateway.
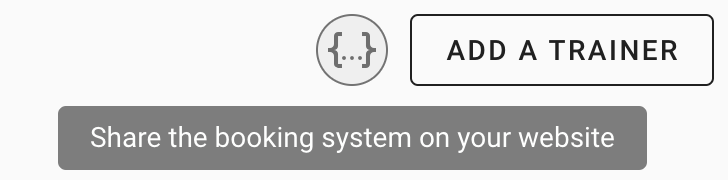
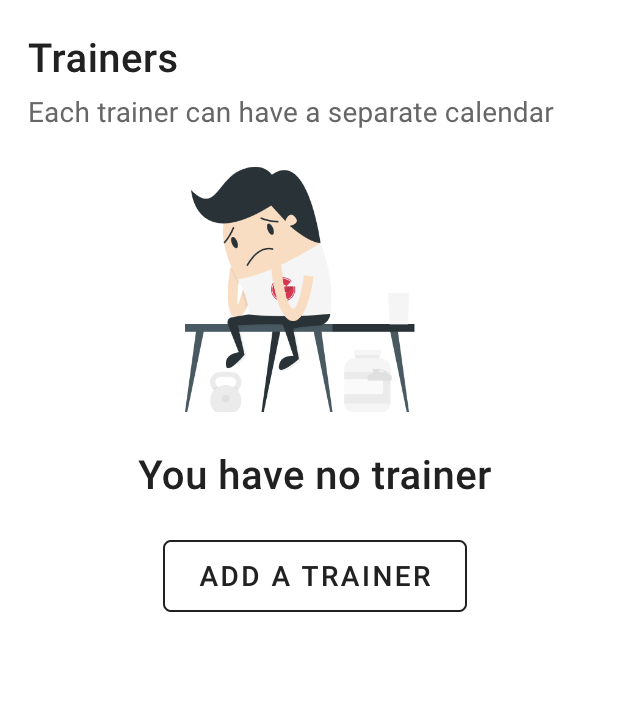
When creating an event in the calendar, you can add a trainer who will lead the event so that they can display the event in their calendar. GYMIFY enables you to create trainer accounts that can be linked to already established manager accounts. To create a new trainer, click Add a Trainer button in the Events section.
The following article describes the system for creating a new trainer. However, the system has been updated and includes a new employee account, Trainer, which is available in the section Employees. You can still use the former method described in this article.
Quick TIP!
If you want to create a personal trainer, fill in the following information, such as name and email. However, if you're going to create a trainer, who will have access to the GYMIFY booking system and the clients, you have to use the Add Employee Account button in the same section; see the picture below.
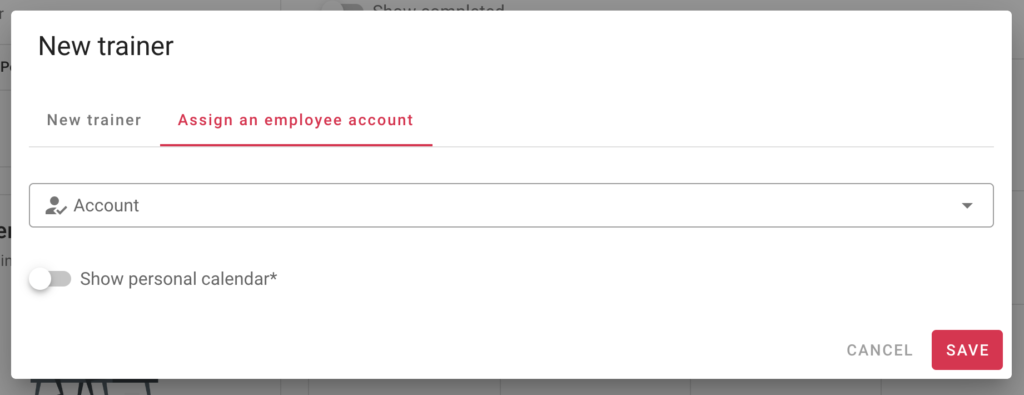
When you are creating the new account, you can add the possibility Show Personal Calendar. If you enable this option, the trainer will have access to a separate calendar showing their events. If you are creating an employee account, you can allow the trainer also access to the general calendar with events of other trainers.
Quick TIP!
If you want to add the possibility to show a personal calendar or add an employee account to an already existing trainer, go to the section Employees and create a new account of the Manager type and link it to the trainer.